
This is the 3rd post in a 6 post series on the Compaq Portable 386 Computer. In this section, we look at turning the computer on, getting it to POST, and taking a peek at the insides & motherboard. You can jump to:
- First Impressions
- The Gas Plasma Screen
- Booting Up & Opening Up
- The Floppy Drive
- The Hard Disk
- Installing MS-DOS
- Youtube VIDEO REVIEW
Now, I, like most people I know, don’t have much patience – I wanted the computer to work out of the box, but there were a host of issues that were quite difficult to troubleshoot and get working before I could even try to get the computer to boot successfully.

Sockets, Plugs & Peripherals
Before we get into that, perhaps it’s best to take a quick tour around the machine to explain all the ports, plugs, drives, slots, and buttons.
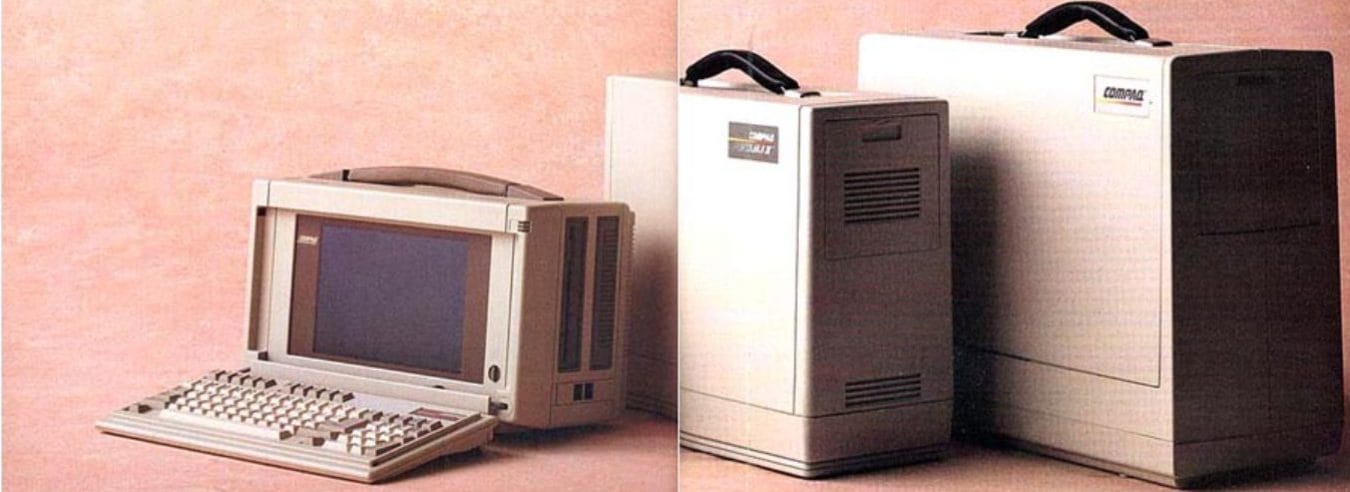
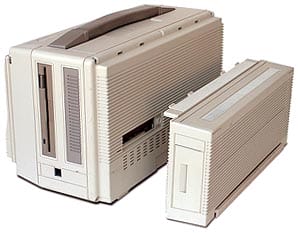
Looking at the machine’s front, you have the screen (covered in this previous post). On the unit’s left side, you have the standard 5.25” Floppy drive (which can be easily replaced with a much more useful 3.5” floppy drive) and a bay for the hard disk. The exhaust takes up the right side to vent the hot air coming from the power supply unit. On the top, you have a comically large, padded handle, running from end to end. Like the screen, it’s is also retractable (the handle makes it so portable and convenient!). I feel like they must have held a focus group on handle-comfort of the Compaq Portable 2 and deduced that they were really lacking in this department, but, the handle on the Portable 386 is a bit overkill.
The rear of the unit houses the serial port, the parallel port, an RGB connector (to an RGB display – not VGA), and also hidden behind a sliding door, a proprietary expansion port for the optional expansion box allowing two full-length 16-bit ISA cards – essential if you want to plug in a VGA card for an external monitor, sound card or memory card.
Note that this computer does not have a battery for power – all references to the “battery” on these units refer to a tiny lithium battery used to keep the CMOS memory from forgetting it’s BIOS settings. In fact, most “portable” computers at the time were not designed to be used “in transit” (like a modern laptop) – they were designed to be moved from place to place and plugged into AC power at your destination. They were marketed to people who traveled or who wanted to take their work home with them. (maybe we have Compaq to blame for all those weekends lost to working from home!)

“The Compaq Portable III, starting with a weight of 18 pounds, provides the power and function of a high performance desktop computer in a small, self-contained unit that is easy to carry.” (AP Photo/Richard Drew)
The Compaq Portable III and 386 take a standard “computer plug” (if you really want to know, it’s called a C-14 type) and auto switches between 110 V and 220 V. Plugging it in and flicking the power switch at the back produces a satisfying click and the machine whirrs to life.
POST (Power On Self Test)
On booting, the computer does some instant basic diagnostics – such as checking the system board for faults and checking the CPU – if all is well, the screen should instantly flicker on in a nice warm orange glow – followed by a RAM counter to check each KB of installed RAM.

The memory check does some basic checking to see how much (continuous) RAM is available – including those installed on the motherboard, the proprietary expansion cards, or those installed on a properly configured ISA ram card via the expansion box.
After the ram check, the machine will try to boot using the CMOS settings provided, meaning it will try to boot from the floppy drive using the drive settings specified. If it can’t find anything a readable disk in the floppy drive, the computer will move on and try to boot from the hard / fixed disk. If you don’t have either set up properly, you will see the message below:

This message is asking you to insert a system or “diagnostic” floppy disk as the computer can’t read the hard disk and needs to boot from its floppy drive. If you see this error even with the correct diagnostics diskette inserted, don’t worry, there is hope! Take a deep breath and grab your power screwdriver – you’ll need to open the computer up to clean or replace the floppy drive and also likely replace the hard drive.
I don’t know about you, but I enjoy opening up computers and exploring what’s under the hood. This older computer is particularly interesting as there are many jumper settings and removable parts that can be fiddled with… without too much frustration.
Disassembling The Compaq Portable 386
The complete disassembly instructions can be found here. You’ll need a set of Torx (star-shaped) screwdriver heads and ideally a power screwdriver. Start by lying the machine screen side down on a flat surface and remove the 6 screws on the back. The screws in the corners are long screws that hold the whole machine together; the two in the middle at the top and bottom hold the rear panel to the rest of the case.
Give the rear panel a gentle jiggle, and the rear of the computer case should come out. Pull up then away to reveal the motherboard underneath. For full instructions on the rear panel removal, see here.

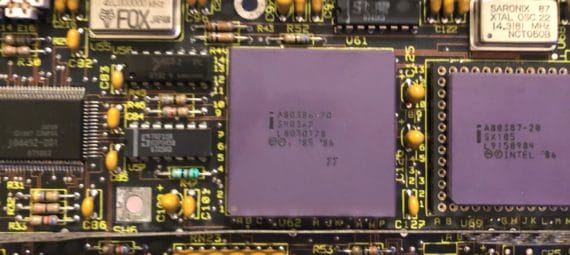
The photo above shows the motherboard after the protective shielding has been removed – you can see the CPU and Math Co-processor on the top right. Below that on the right edge is the socket for the battery to keep the CMOS settings. On the bottom right, you have the serial, parallel, and RGB video output ports. Continuing along the bottom edge, in the center, you will find the ribbon cable connection for the graphics card underneath, and past that is the connection (and space) for the hard-to-find 32-bit memory modem expansion interface for the modem card/memory expansion boards (which can provide up to 10 MB of RAM).

It’s more than likely that one or more of the items below will need to be repaired or replaced; luckily, assembly and disassembly of this computer is relatively easy.
- Hard Disk – these are one of the first IDE drives developed ranging from 20 – 300 MB. Due to age, they likely won’t spin up. If they do, download and archive what’s on the disk while you can. You can replace this with a Hard Disk or, better yet, a CF Card
- Floppy Drive – 32 years is a long time to accumulate dust. Take a look under your fridge for reference. These wide-mouthed 5.25″ floppy drives usually are very dusty and thus fiddly to get working consistently. Be ready to change drive belts and apply lubricant to get them fully working, or, more than likely, you will have to replace it. Alternatively, you can easily upgrade the floppy drive to a 3.5″ – covered in this post – making it much easier to transfer files from your main machine.


- CMOS Battery – You will need this to keep the CMOS system settings in the memory alive. Believe it or not, some people have these units where the lithium battery is still ticking and giving current for the CMOS to save settings. You don’t really want to count on that, though, and it should be replaced – a CR2020 3v button battery makes a good choice. I simply snipped off the old battery’s connections and sandwiched a CR2020 between the leads, checked it with a multimeter, and then secured it with electrical tape.
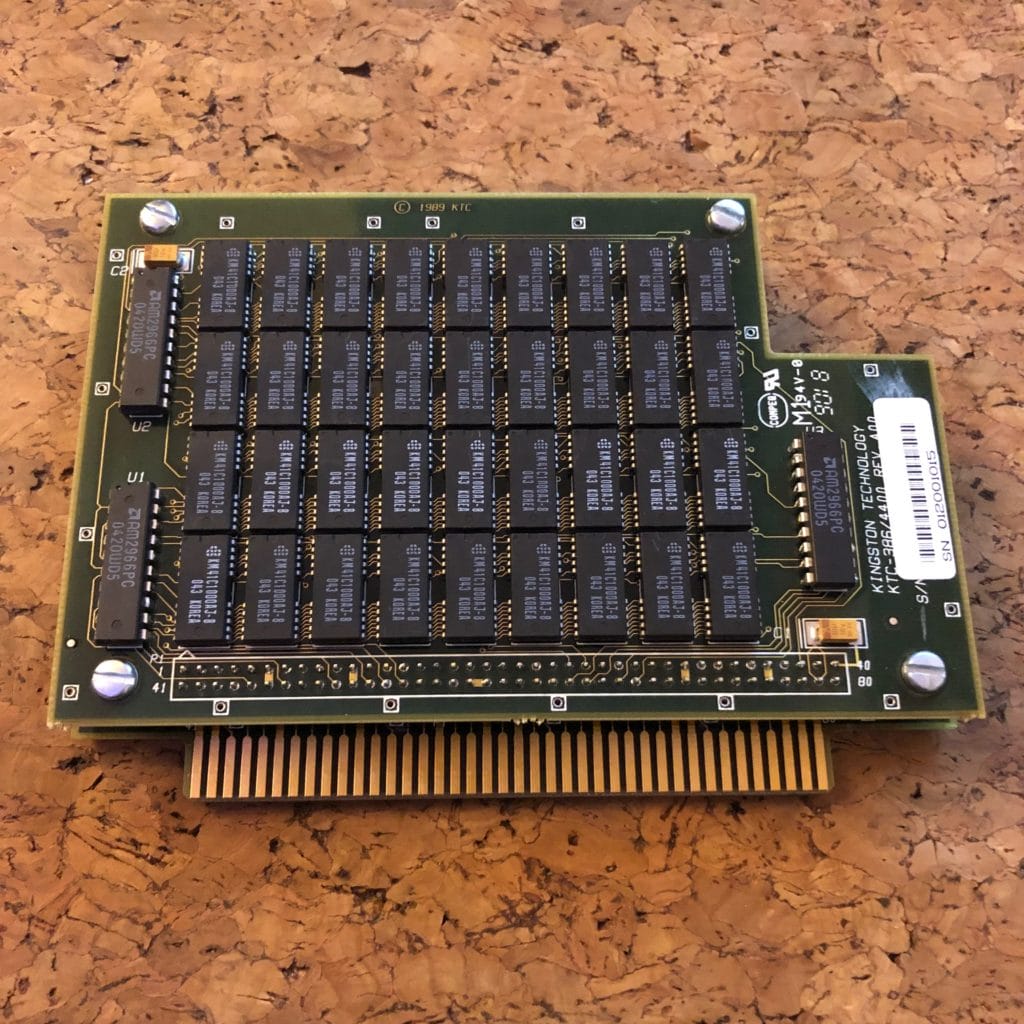
- Visually inspect the Motherboard – check for jumper configurations, any blown tantalum capacitors, and see if you happen to have any optional (and extremely expensive) memory expansion boards. These are so rare that one seller on eBay has listed a unit with one of these installed at US$999.99 – here’s my 10MB upgrade card below – it’s aftermarket, made by Kingston Technologies.
So hopefully, you now have an idea of what you need to replace. If you have to replace both the floppy disk and the hard disk, or if you are not sure if your hard disk is working or not, and your floppy drive is not working, definitely, replace the floppy drive first.
If your floppy drive is working but you can’t get boot to your hard disk, see what your choices are for replacing the hard disk
Don’t forget to check out my video review below:
You wouldn’t have a copy of a Compaq diagnostic 5.25 floppy disk You would like to sell?
Hi I don’t – but here is a link to one on ebay https://www.ebay.com/itm/Compaq-Portable-III-MS-DOS-and-Diagnostics-Setup-Floppy-Disks/333330384132?hash=item4d9c0a0504:g:qlMAAOSwhPZdfe7X
hi eric,
did you ever get a diagnostic 5.25 disk? i am in dire need of one myself. if you have one would you make a copy? my 386-25 is used for cadd only and was working great,untell the fan failed.the disk drive board had to be femoved to replace the fan,on restart it asked for the diagnostic disk which i cant find.
regards bob
Hey Bob, I have swapped out my 5.25 drive for a 3.5 floppy disk drive so I only have those. Do you have access to a computer that can boot? You can download the images online and write them to a disk.
Hi am I glad to hear from you…I am not very computer savy. The computer I am using to chat with you is running on XP which has a 3.25 disc My Compaq is not online….so could you send it to my email then could I copy to a 3.25 disc and use in the compaq?. If you would like to call my number is 925 838 0582
Bob
Hi there, I hope you are doing well!
I recently aquired a CP386, I’m relatively new to vintage computers and I had a couple of questions about installing a ISA memory board as you have done here in my system. I appriciate maybe these are simple questions but I’d really be grateful if you could correct, or just confirm my thinking on a few things as i’m pretty much going off of guesswork and my understanding of the cp service manuals.
Did you have to populate the four propriatary memory slots on the motherboard before adding your memory card? I Read in the service manual that you can’t use the 4 or 2MB expansion boards compaq sold without having all four slots populated, but I’m unsure how this works with external system memory?
To the best of my limited understanding, It would be better to look for a 16bit card for this purpose as I’m likely to find a card with a greater total memory, but 8 bit cards do work with pc/xt compatibles / 32bit processor systems that use the ISA bus?
Was it difficult to configure the memory card? I’ve seen that many have jumpers / dinn switches for configuration and I also know both the cpcIII and 386 have jumpers for configuring memory too, but again my wonder is, is that purely for mainboard memory or do those settings affect external memory too?
Thank you very much for your time!
Za Goggin.
Hi there, if memory serves me correct, the simms on the Compaq portable 386 need to be fully populated before you can expand the memory further. After the simms are installed, then there is a 2x 4MB memory cards that can be installed, along with a 32 bit adapter that connects the new memory to the motherboard. You just need to select the right jumpers then the computer should post showing the newly installed memory configuration. Memory installed on the Isa bus will slow down the computer significantly as the bus is 8/16bit while the proprietary memory cards are 32 bit. Hope that helps!
Hi there,
Thank you for taking the time to respond to me and for your advice, I appreciate it alot!
have a nice weekend.
Hi, I recently got my cp386 online and tried to install dos 6.22 on my portable 386, When I booted the machine using a startup disk, I could enter drive c just fine, but the computer just won’t boot from its internal hard drive (The drive clicks for a few times and the screen displays “disk error press any kay to restart”) I tried using the fdisk /MBR command, and after restarting, the computer still showed “disk error”. I am using a IDE disk on module with a capacity of 256 mbytes. Any ideas?
Hi, consider yourself lucky! Time has not been kind to this particular model of Conner Hard Drive, I have only heard of a few still in working order – your best bet would be to use a CF card adapter and CF card with a drive overlay program (like OnTrack) for long term use. Other than that though, the Compaq Portable 386 is built like a tank!
I just got one of these compaq portable computers too, and I am about to restore it, the hard drive seems to spin up OK, but of course the battery has log time ago expired.
Can it be replaced with a modern lithium cell battery? I do have an install or setup disk.
Russ
Hey Russ – I just used alkaline batteries in a holder to power the CMOS memory. With the battery depleted / removed, you can only enter the setup through a floppy disk. These are regularly sold on ebay. Hope that helps!
Anybody know which of the tree pins on the cmos battery socket is Miami’s and plus. In my example the cable and battery is missing so I’ve got nonpayment to find out what is what and Google refuses to help.